Showing posts with label flex. Show all posts

Thursday, January 19, 2012

Not changing direction, just stepping the game up

The first Apache Flex blog post is here:


Flex settling in at The Apache Software Foundation
This is the beginning of a new era for Flex. On December 31st 2011, our project was accepted as an incubator podling at the Apache Software Foundation. read more..

Thursday, March 24, 2011

Unit testing with FlexMojos and displaying Cobertura coverage in Sonar

The great thing about running unit tests with FlexMojos 4 is that it can also generate code coverage report. See it here http://www.sonatype.com/people/2010/04/flex-test-coverage-kept-simple-with-flexmojos/

I just love that feature, because in the past you had to use a modified version of the Flex SDK with an external AIR Application to do that, but now it is very simplified.

I also love using Sonar to gather and display statistics for source code. I thought it would be great to build my project and run unit tests with FlexMojos and then reuse the reports created by it and show this information in Sonar. You are able to reuse the surefire reports using the flex plugin for Sonar, but however this was not possible for the cobertura coverage report . So what I did was to browse the code for this plugin and see how Olivier Gaudin and Evgeny Mandrikov, the guys written it, handle the surefire reports. And so I though that it was going to be easy using the code from the cobertura sonar plugin to implement this feature. And somehow I did.

I've added this patch in the Jira, so hopefully in the next version it will be included. Until the official version, you can use my modification (see bellow for download)

Here is how to use it. In your pom.xml you would have something like

 src
 test


   org.sonatype.flexmojos
   flexmojos-maven-plugin
   4.0-beta-5
   true


    com.adobe.flex
    compiler
    4.1.0.16248
    pom


    TestSonar.mxml
    C:\FlashPlayer\FlashPlayer.exe
    true
    
	xml 
    
    true


That snippet would build and test your project. Important here is to specify coverage and coverageReportFormat . The coverageReportFormat is xml, so it can be used later on.

And the properties in the pom.xml for the sonar plugin are

    flex
    reuseReports
    target\surefire-reports
    target\coverage\coverage.xml
  

I think everything here is understandable, you specify to use the plugin for flex and reuse the generated reports for surefire and cobertura.

See the full pom.xml here

And to build all up run:
mvn clean install sonar:sonar -Pflex

Have in mind that you should use maven 3 for FlexMojos 4

See the result


So if you can't wait to try this out, get this patched version, if not you could probably wait for an official release, I hope there will be one soon.

Download the patched version of flex plugin for sonar from here. (Again, this is my modification of the original version, it is not the version provided by Codehaus, Sonar)

Download the test Flex project with Unit tests from here

Tuesday, November 23, 2010

Seriously, how to position your UIComponent in Flex?

Believe it or not, but recently I struggled to achieve something so simple like positioning a Button by X and Y. What was the case:

We have a Button with X and Y values binded. We also set depth to this button, lets say 1. And we want at some point to change its position. The code for the whole application looks like

<s:Application xmlns:fx="http://ns.adobe.com/mxml/2009" 
         xmlns:s="library://ns.adobe.com/flex/spark" 
         xmlns:mx="library://ns.adobe.com/flex/mx">
  
  <fx:Script>
    <![CDATA[
      [Bindable]
      public var buttonX:Number;
      [Bindable]
      public var buttonY:Number;
    ]]>
  </fx:Script>
  
  <s:Button label="Target" x="{buttonX}" y="{buttonY}" depth="1"/>
  <s:HGroup horizontalCenter="0" verticalCenter="0" >
    <s:Button label="buttonX = 100" click="buttonX = 100"/>
    <s:Button label="buttonY = 100" click="buttonY = 100"/>
  </s:HGroup>
  
</s:Application>

It looks pretty straight-forward. But there is a catch. Here is the application. Try to move the button, I dare you :)


There are 2 important things that are happening here:

1. By default buttonX and buttonY are NaN. That basically is not a problem, because we will set actual values to them and they will change, but if it wasn't for
2. When we set depth to an instance of UIComponent, the special layoutFeatures are being initialized. They are responsible for advanced features of the layout such as:
depth, z, rotationX, rotationY, transformX, transformY and so on..

So once these layoutFeatures get initialized, for every new assign of x, y, width, height scale.. it uses the layoutFeatures object of UIComponent to set them. And this time it is not overwriting the values, instead it is doing a translation (when setting x). The actual thing it is being done is : translateBy(value-_x,0,0); where _x is the old x, and value is the new that we are assigning. So when our old value is NaN...
you guessed NaN - whatever_number = NaN

So I wondered whether this is a bug and should be reported to Adobe (if it already isn't). But I am this type of a guy where I always blame myself, so I think maybe the guilt is mine. So I have to fix my code. The easiest and proper fix is to assign default values of 0 to the properties we are binding ... or not using depth at all, who needs it ;)

[Bindable]
public var buttonX:Number = 0;
[Bindable]
public var buttonY:Number = 0;

Sunday, August 8, 2010

Animating the perspective projection of a DisplayObject

So as you probably know, in flex 3 we could animate objects only by their numerical properties. Which for most situations is enough, like positioning or resizing component. But sometimes you will want to animate a complex object, and in flex 4 that is possible using arbitrary type interpolation. You can see this great demo on the topic on adobe tv by Chet Haase. Mine example isn't nothing more special than his, I just decided to do it because I saw few people entering my blog wanting to see an example of using perspective projection other than in my previous post - custom flex 4 layout and because recently I had to do similar animation, but I have done it the "dirty" way (yeah I admit it), so I thought it is time to correct it.


The most important thing is our PPInterpolator and its method interpolate()

public function interpolate(fraction:Number, startValue:Object, endValue:Object):Object
{
    var startPP:PerspectiveProjection = startValue as PerspectiveProjection;
    var endPP:PerspectiveProjection = endValue as PerspectiveProjection;
    
    var currentPP:PerspectiveProjection = new PerspectiveProjection();
    currentPP.fieldOfView = startPP.fieldOfView + fraction * (endPP.fieldOfView - startPP.fieldOfView);
    currentPP.focalLength = startPP.focalLength + fraction * (endPP.focalLength - startPP.focalLength);
    
    var projectionCenterX:Number = startPP.projectionCenter.x + fraction * (endPP.projectionCenter.x - startPP.projectionCenter.x);
    var projectionCenterY:Number = startPP.projectionCenter.y + fraction * (endPP.projectionCenter.y - startPP.projectionCenter.y);
    
    currentPP.projectionCenter = new Point(projectionCenterX, projectionCenterY);
    
    return currentPP;
}

You see that we expect startValue and endValue to be instances of PerspectiveProjection and return a new instance based on these values as a value for the current moment of the animation.

The other thing is as just writing a normal animation, we are just setting the interpolator of the motion path to be the one we created and set the target of the animation the transform property of a group (it could be any other DisplayObject). Have a look at the valueFrom and valueTo, we are passing instances of PespectiveProjection

<fx:Declarations>
    <effects:PPInterpolator id="ppInterpolator"/>
    
    <s:Animate id="ppAnimate" target="{group.transform}" duration="3000" >
        <s:motionPaths>
            <fx:Script>
                <![CDATA[
                    import com.tgeorgiev.effects.PPInterpolator;
                ]]>
            </fx:Script>
            <s:SimpleMotionPath property="perspectiveProjection" valueFrom="{startPP}" valueTo="{endPP}" interpolator="{ppInterpolator}" />
        </s:motionPaths>
    </s:Animate>
</fx:Declarations>

The group that is the target of the animation just holds 3 images with different rotations and positions.

That's all, I suggest you play with the random animate button, for fun :)

Thursday, May 13, 2010

Viewing Word Documents with Flex

Recently I have started a very interesting project and part of the project is to be able to display .pdf and .doc files in a flex application.

[Source: www.sudafrica.it/documenti%20calcio%202010/Zakumi.doc ]


[Source: http://www.primussoccer.com/Zakumi.pdf]


For the pdf I had luck finding this great tool FlexPaper. The idea behind it was to convert the pdf to swf using PDF2SWF from SWFTools so for every page of the PDF document you had a frame in the swf.
FlexPaper does a great job for viewing .pdf documents, but what about .doc?
Well I guess the solution had to be pretty much the same - convert the doc to swf and display it with FlexPaper. Unfortunately I could not find any good doc to swf converter.

So I asked myself why not just convert the Word document to Adobe Reader document and then do the same what I am doing for .pdf documents (convert them to .swf and view them with FlexPaper). That seemed like the straight-forward solution. Converting .doc to .pdf (and other various formats) is really easy with OpenOffice and it comes for Windows, Linux and Mac OS. When you open your document you just have to click File and Export as PDF.


After that we start PDF2SWF from the command-line with the corresponding options


However if you want to make this process programmatically in a headless mode here is the solution. There is this Java library called JODConverter that relies on OpenOffice that comes here for the help.
So here is how to convert Word documents to Adobe Reader documents programmatically with Java

public static File convertToPDF(File file){
  String oldFilePath = file.getAbsolutePath();
  //change the extension to .pdf
  String newFilePath = oldFilePath.substring(0, oldFilePath.lastIndexOf(".")) + ".pdf";
  
  OfficeManager officeManager = new DefaultOfficeManagerConfiguration().buildOfficeManager();
    officeManager.start();

    OfficeDocumentConverter converter = new OfficeDocumentConverter(officeManager);
    File newFile = new File(newFilePath);
    converter.convert(file, newFile);
    
    officeManager.stop();
    
    return newFile;
}

After we are done with this, we have to convert the pdf to swf

private static File convertToSWF(File file) throws IOException{
    String oldFilePath = file.getAbsolutePath();
    //change the extension to .swf
    String newFilePath = oldFilePath.substring(0, oldFilePath.lastIndexOf(".")) + ".swf";
    
    //calling pdf2swf to convert our file.pdf to file.swf

    String[] command = { "pdf2swf", file.getAbsolutePath(), "-o", newFilePath, "-f",
            "-T 10", "-t", "-G"};
    
    Process p = Runtime.getRuntime().exec(command);
    
    BufferedReader in = new BufferedReader(new InputStreamReader(p.getInputStream()));  
    String line = null;  
    while ((line = in.readLine()) != null) {  
        log.info(line);  
    } 
    
    return new File(newFilePath);
}

This is my workaround for viewing Word Documents with Flex, maybe you have a better solution? I'd love to hear it.

Monday, March 29, 2010

Custom Flex layout. Safari-like Top Sites

Maybe you are asking yourself "Why am I here?" Well the simple answer is here:


So what is this? It's a custom flex 4 layout that displays elements as in cylinder. The idea for it I got a long time ago when I saw Safari's Top Sites. Back then I managed to achieve this look and feel with flex using Papervision3D. But I didn't like the way I made it at all. So year later I have decided to try again. This time with the native 3D support of Flash Player 10 and the new layouting in Flex 4 it was quite intuitive and the most proper solution.
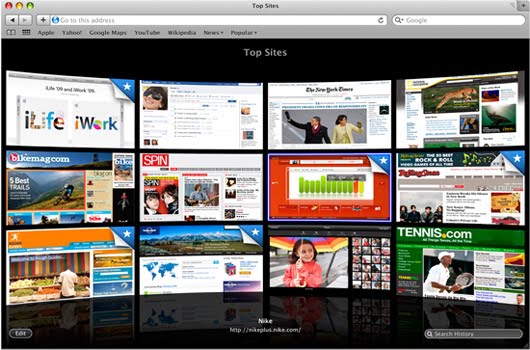

Enough talking lets see the real thing. So this is the Safari Top Sites that inspired me

And this is the result

You can see the Flex Top Sites application here and the source code here.

The logic of implementing a custom 3d layout I got from these posts of Ryan Campbell and Evtim Georgiev

The basic things are
  1. Create a class that extends LayoutBase
  2. On updateDisplayList position and transform the images
  3. Transforming elements(images) to look like they are in cylinder
    The idea here is to move the element in the back (translate over Z) and then rotate over the Y Axis
  4. Do the same for the other elements but rotate them by different angle and/or translate over Y
  5. Bring the images more in front (because the current look would be if we are in the center of cylinder)
The code for the last 3 is

var matrix:Matrix3D = new Matrix3D();
matrix.appendTranslation(-_columnWidth/2, 0, radius);
matrix.appendRotation(startDegree + degreesMove*j, Vector3D.Y_AXIS);
matrix.appendTranslation(width/2, (_rowHeight + _horizontalGap) * i ,-cameraPosition);
element.setLayoutMatrix3D(matrix, false);

Important thing here is
var pp:PerspectiveProjection = new PerspectiveProjection();
pp.projectionCenter = new Point(width/2, height/2);

element["transform"].perspectiveProjection = pp;

In short words when providing this when we rotate the element the point of the rotation will be the center of the screen (container).

The other things are just plain geometry calculations, like finding the radius, chord, arc of a circle. Really important thing is to imagine both 3D cylinder, 2D circle from top and 2D rectangle from front.

The TopSiteLayout.as provides also options to specify number of rows, columns, width of columns, height of columns, vertical and horizontal gap, although it works just fine if you let it calculate these values itself

And to finish with, I have added this reflection for the 4 images at the bottom. I am using WetFloorFilter from Gonta. It is really good and it is for Flex 4

var filter:WetFloorFilter = new WetFloorFilter();
filter.height = 100;
filter.alpha = 0.5;

BindingUtils.bindProperty(filter, "y", thumbnail, "height");

thumbnail.filters = [filter];

And basically that's all. You can download the custom layout from here.
Would really like to hear what you think

Sunday, March 7, 2010

Browse and download files with Flex, Spring and BlazeDS

After writing about Uploading Files with Flex and Spring via BlazeDS the next logical step is to write another example of how to browse and download them

This example will show how to get a list of all files and folders from a specific directory on the server, display them in the client's application, browse these directories and/or download specific files.

So you may see that in the previous post I used Flex 4. I really wanted to create this example also with Flex 4, but I had problems with creating an itemRenderer for DataGrid, even found about this MXDataGridItemRenderer but still. I would appreciate if someone would comment about how to get over this. But whatsoever the example that I'm going to show here is created with Flex 3.5 and we all know how cool is it :)


This time we will start with the Spring implementation. So first we have this variable
private File currentDirectory = new File(System.getProperty("user.home"));
This will keep track of our current directory, as we will browse the content from the client application. I've taken a note from Helen Neely on my previous post and now the path is OS independent and it points to the user's home directory.

@RemotingInclude
public List<FileInfo> listFiles() {
    
    File files[] = currentDirectory.listFiles();
    ArrayList<FileInfo> allFiles = new ArrayList<FileInfo>();
    
    for(int i = 0; i < files.length; i++){
        if(!files[i].isHidden())
        {
            allFiles.add(new FileInfo(files[i].getName(),
                    files[i].length(), files[i].isDirectory()));
        }
    }
    return allFiles;
}

This method takes all the files and folders that are in the current directory that are not hidden (personal likeness) adds them in an ArrayList and returns the list. You can see that here we are creating new objects of type FileInfo, that is just a small class I wrote that has properties like name, size, isDir and data . There is also a corresponding to this class in the Flex project so we can map them.

@RemotingInclude
public void changeDir(String dir) {
    if(StringUtils.hasText(dir)){
        File tempDirectory = new File(currentDirectory.getPath() + File.separator + dir);
        if(tempDirectory.exists() && tempDirectory.isDirectory())
            currentDirectory = tempDirectory;
    }
}
When called this method with a name of folder we look if there is a folder with this name in our current directory and we change the current directory to it.

@RemotingInclude
public FileInfo downloadFile(String fileName) throws Exception {
    
    File file = new File(currentDirectory.getPath() + File.separator + fileName);
    FileInputStream input = new FileInputStream(file);
    byte data[] = new byte[(int)file.length()];
    input.read(data);
    
    return new FileInfo(file.getName(), file.length(), file.isDirectory(),
            data);
}
Basically this creates a new FileInputStream for the file specified by the current directory and filename and reads it's data in a array of bytes and then we return a new FileInfo instance that holds these bytes.

Having these methods we are ready to write our client application.
On creation complete we call
remoteBrowseDownload.listFiles();
place a DataGrid and for it's dataProvider bind to the last result of this operation
<mx:DataGrid id="dataGrid" width="100%" height="100%"
     doubleClickEnabled="true" doubleClick="dataGridDoubleClick(event)"
     dragEnabled="true"
     dataProvider="{remoteBrowseDownload.listFiles.lastResult}">

In the data grid when a user double clicks on a folder we will have to open the folder and display it's content
public function changeDir(dir:String):void
{
    remoteBrowseDownload.changeDir(dir);
    remoteBrowseDownload.listFiles();
}
Where "dir" is the name of the selected folder.
When the item is not a directory, we have to download it. It is done by this function:
public function downloadFile(file:FileInfo):void
{
    for (var i:int = 0; i < downloadedFiles.length; i++)
    {
        if(file.name == downloadedFiles[i].name && 
            file.size == downloadedFiles[i].size)
            return;
    }
    
    remoteBrowseDownload.downloadFile(file.name);
    
    file.isDownloaded = false;
    downloadedFiles.addItem(file);
}
We are doing a simple check whether this file is already downloaded and if it's not we call the downloadFile method from our service with only the name of the file and add it in this downloadedFiles array that holds all of our downloaded files. You can see how fast the data is transfered, this is thanks to BlazeDS and AMF.

As this downloading could take longer (depending on the file size), we provide an event handler for the result., that just set the flag isDownloaded to true.
private function onFileDownloaded(event:ResultEvent):void
{
    var file:FileInfo = (FileInfo)(event.result);
    file.isDownloaded = true; 
    for (var i:int = 0; i < downloadedFiles.length; i++)
    {
        if(file.name == downloadedFiles[i].name && 
            file.size == downloadedFiles[i].size)
        {
            downloadedFiles.setItemAt(file, i);
        }
    }                
}

When files are being downloaded we display them in another grid with a progress bar and when the download completes, a button  "save" appears to allow the user to save the file on his file system. To save a file we use the FileReference.save.
public function saveFile(file:FileInfo):void
{
    var fileRef:FileReference = new FileReference();
    fileRef.save(file.data, file.name);
}
Have in mind that use this feature you have to target your application to use Flash player 10.

So basically, that's it. I've also played to add drag and drop support and other stuff, but yo could see by downloading the source.

Download Flex and Spring projects

EDIT: From the Spring project I have made a Maven 2 project, that you can also download

Friday, February 26, 2010

File upload with Flex and Spring

Last I wrote how to connect Flex with Spring. Now I have decided to create an example of uploading multiple files via BlazeDS and here I will show it to you.

You can see the new article on browse and download with Flex, Spring and BlazeDS


So in the example we have 2 buttons (browse and upload) and a data grid  that will display the selected files.

<s:Button label="Browse Files" click="browseFiles(event)" />
<mx:DataGrid id="dataGrid" width="200">
    <mx:columns>
        <mx:DataGridColumn headerText="Selected files"/>
    </mx:columns>
</mx:DataGrid>
<s:Button label="Upload Files" click="uploadFiles(event)"/>

When the first button is clicked we call the browseFiles function that creates an instance of FileReferenceList and opens up the file dialog for browsing.

private function browseFiles(event:MouseEvent):void
{
    fileRefList = new FileReferenceList();
    fileRefList.addEventListener(Event.SELECT, selectFiles);
    fileRefList.browse();
}

Now when the user selected some files and presses "open", the function selectFiles is called
private function selectFiles(e:Event):void
{                
    for each(var fileRef : FileReference in fileRefList.fileList)
    {
        fileRef.load();
        selectedFiles.push(fileRef.name);
        selectedFileReferences.push(fileRef);
    }
    dataGrid.dataProvider = selectedFiles;
}


It iterates over the list of FileReference (the selected files) and for each it loads the file, adds its name to an array of strings, that we use to show in the data grid and to an array that holds the selected file references, so that we can add more on another pressing of "browse"


Now we should be able to see our data grid filled with names of files.
The next thing to do is to create a function for handling the click of the "Upload Files"  button.

private function uploadFiles(e:MouseEvent):void
{                
    for each(var fileRef : FileReference in selectedFileReferences)
    {
        remoteObjectUpload.doUpload(fileRef.name, fileRef.data);
    }
}

For each FileRefernce we call our remote method by passing the file's name and the file's data represented by BytesArray.
The actual Java class and method looks like:

@Service("fileUploadService")
@RemotingDestination(channels = {"my-amf"})
public class FileUploadService {

    //change this to the desired path you wish the files to be uploaded
    private static String File_Path = "C:\\workspace\\Temp\\";
    @RemotingInclude
    public static Boolean doUpload(String fileName, byte[] data) {
        try{
            //create the dir that we will store files
            File dir = new File(File_Path);
            dir.mkdirs();
            
            File file = new File(File_Path + fileName);
            FileOutputStream output = new FileOutputStream(file);
            output.write(data);
            output.close();
        }
        catch(FileNotFoundException e){
            return false;
        }
        catch(IOException e){
            return false;
        }
    
        return true;
    }
}

The doUpload method just creates the directories to the File_Path, creates a new output stream for the given file and writes the bytes.

And aggain you can see the other scenario - downloading the files

You can download the files for both Spring and Flex projects from here:
FileUpload.zip

EDIT: From the Spring project I have made a Maven 2 project, so that you can also download

Friday, January 22, 2010

Flex Spring BlazeDS Integration (on public web server)

This won't be a post about how to integrate Flex and Spring. Actually I intended to be one, but several days ago James Ward posted this tutorial on how easy it is to do with Flash Builder 4 so I thought it won't be necessary.

Edit:  you can checkout the new post of how to upload files with Flex and Spring

What I will show is how to upload our project to a free Java and Tomcat host to test it, connect our Flex application to it and show this example here. I've been looking for such free hosting and the only thing I've found (if there are any others please comment) is eatj.com that provides a free trial limited up to 50 MBs of storage and every 6 hours the server is restarted, but for testing is fine.


I assume that you already created your Spring project based on the tutorial. I've added small changes for the current example, if you want the source of the example get it from here. Now right click on the project -> Export -> WAR file and select where to export it.
Now we log into our account in eatj.com and upload the war file, restart the server and this is it.

Now for the Flex part, although I haven't used the Data Wizards from Flash Builder (as I've had small problems) I did it the old fashioned way and the source is:

<?xml version="1.0" encoding="utf-8"?>
<s:Application xmlns:fx="http://ns.adobe.com/mxml/2009" 
         xmlns:s="library://ns.adobe.com/flex/spark" 
         xmlns:mx="library://ns.adobe.com/flex/halo" minWidth="1024" minHeight="768"
         applicationComplete="remoteObject.addMessage(null, null, null)">
  <fx:Script>
    <![CDATA[
      import mx.controls.Alert;
    ]]>
  </fx:Script>
  <fx:Declarations>
    <s:RemoteObject id="remoteObject" destination="myService" fault="Alert.show(event.fault.message);">
      <s:channelSet>
        <s:ChannelSet>
          <s:AMFChannel uri="http://maverix77.s215.eatj.com/spring-flex-server/messagebroker/amf"/>
        </s:ChannelSet>
      </s:channelSet>
    </s:RemoteObject>
  </fx:Declarations>
  
  <mx:DataGrid x="0" dataProvider="{remoteObject.addMessage.lastResult}" width="402" y="0">
    <mx:columns>
      <mx:DataGridColumn dataField="sender"/>
      <mx:DataGridColumn dataField="text"/>
      <mx:DataGridColumn dataField="date"/>
    </mx:columns>
  </mx:DataGrid>
  <mx:Form x="10" y="160" width="252" height="142">
    <mx:FormHeading label="Leave new message" width="206"/>
    <mx:FormItem label="Your name">
      <s:TextInput id="nameInput"/>
    </mx:FormItem>
    <mx:FormItem label="Message text">
      <s:TextInput id="messageInput"/>
    </mx:FormItem>
    <s:Button click="{remoteObject.addMessage(nameInput.text, messageInput.text, new Date())}" label="Send"/>
  </mx:Form>
</s:Application>


Yep that is Flex 4, my first Flex 4 app in my blog :)

So now we compile it and we have our swf. For this example I will upload it to http://sites.google.com/ which I use to publish my files to.
There is one last thing to do, to create and configure a crossdomain.xml on our server.

We create on out local machine crossdomain.xml looking like:

<?xml version="1.0"?>
<!DOCTYPE cross-domain-policy 
  SYSTEM "http://www.macromedia.com/xml/dtds/cross-domain-policy.dtd">
<cross-domain-policy>
   <allow-access-from domain="*.googlegroups.com" />
</cross-domain-policy>

The weakness here is that everyone from *.googlegroups.com can connect, but as this is an example it is not a problem, and I don't think someone will be that interested :)

Now with your favorite ftp client, connect it to host: s215.eatj.com port:21 your account's username and password. Navigate to /webapps/ROOT and copy the crossdomain.xml there.

Click here to see the result. EDIT: Unfortunately the eatj trial account shuts down the server 6 hours after it was started. That's why sometimes you wont be able to connect to the server

Source code:
spring-flex-server
FlexSpring

Thursday, January 7, 2010

It's that time again. Mountain View

Hello!
First of all I'd like to wish Happy New Year!
I have a present for you (well it's actually for me but you can benefit)
Last winter I went to a ski/snowboard sale, with no particular reason, and whatta you know I got home with a snowboard, pair of shoes, bindings and everything. The next day I was already conquering the Vitosha mounatin. That was when I rode snowboard for the first time of my life. And whole season I was so thrilled of how cool is that so whenever I had a chance I went to the mountain to snowboard. So here comes another season, and I will not miss a chance to hop on the lift.
But unfortunately the weather here in Bulgaria is very strange. At new year's eve the temperature was 12°C when 3 days before that it was -10°C. So to go to the mountain you have to know if the weather there is ok and is it ride-able (able to ride :P ). You can always check some websites see what the weather is, other to see web cams of the resorts, but why not have a small application that checks this for you. For that purpose what could be better than an Air application. So I sat one day and decided to create an application showing the weather condition for the next few days, and whether you should go and ride or go and waste time because of the bad weather. Here for all you ski/snowboard/snow/mountain lovers I present you MountainView.


MountainView provides 3-day weather information and live images from webcams for these ski resorts: Vitosha, Bansko, Borovets, Pamporovo. I'd like to thank http://www.snow-forecast.com/ for providing the weather feed, which I personally think is the most correct forecast. I would also like to thank www.skivitosha.com, www.banskoski.com, www.borovets-bg.com, winter.pamporovoresort.com and www.bulgaria-hotels.com for providing maps and webcam images of the resorts.

Download MountainView

So grab it, play with it. Please comment you thoughts
MountainView is created with Adobe Flex. Check out the source code from here

Monday, October 12, 2009

Flex/Flash chart libraries

Hey there!

I've been developing different Flex applications for some time and recently I am working on a charting component build on Flex. I was using flex data visualization framework, and I loved it. It was very easy to visualize different kind of data, and to create custom components. There were some issues, but you could fix them. Everything good, but this framework isn't free... That wasn't a problem for me as I already had a license, a student license for Flex Builder 3 Pro which Adobe kind fully gave me. But friends of mine and colleagues are not able to receive it, so they have the chance either to buy Flex Builder Pro license (which goes with data visualization) or to search for a free alternative

Here I will discuss the 3 best alternatives, from my point of view.

But first let's see how the Flex data visualization looks like, and how can we use the other libraries to display it like that


And we're of on the adventure of searching the best Flex/Flash chart library...
Maybe the first result you encounter, when you Google "flash chart" is
  • Open Flash Charts. It is a charting library build on actionscript. As you may see from the examples it is very elegant and easy to set up. It reads JSON data to do the configuration and there are different libraries for JAVA, Python, php that make it easier. There is even a very good extension so that you can use it as a flex component and a charting explorer that you can find here. The good thing is that is easy to display simple charts (well sometimes it's really tough when you write your own JSON object) and it is very lightweight (only actionscript) The bad is that if you want to change, modify something it's really hard.

    Here is a simple example of a Line Chart made with Open Flash Charts


  • Axiis I have followed Axiis a long time ago, from the first posts of Thomas Gonzales and Michael VanDaniker but never had the chance to try it until now. It is an open source data visualization framework for Flex based on Degrafa. At first I was a bit confused with all those geometry repeaters, but head on trying it and I saw that it was very easy to configure whatever you like, and it's very flexible. If you've done some work using Flex Data visualization you will find it very easy and intuitive to create your own charts. It is new, still beta but at this stage very popular. It's free, It's on google code... what more can you wish for :)

    Example of Line Chart created with Axiis


  • Flare is another actionscript library, port of Prefuse for JAVA. Unfortunately I haven't researched a lot for this framework, but at first sight I found it very complex and not as intuitive as Axiis. Check out the examples to see how complex visualization you can make. It's great for transitions and effects you can create. It's advantage over the other two libraries is it's complexity, but it's also it's disadvantage, if I may say. What I mean is, that if you want more complex visualizations you definitely would like to grab Flare, but for other cases when you want just a simple line, bar or pie chart it's better to choose something else.

    [Example]

I will upload source code if there is interest. See also a comprasion between Flare and Axiis http://www.pathf.com/blogs/2009/05/flare-vs-axiis/ And now which library suits you best?